The Sourdough Baking Process
There is really no such thing as a “Sourdough Bread Recipe”.
There are
- the ingredients, and then there is
- the method —the process.
There are several stages and different steps that take a dough from a blob to a taught dough that holds its shape.
Once you wrap your head around the processes of sourdough bread baking, you can deconstruct any “sourdough recipe” online.
When you know the structure of a sourdough bread, any sourdough bread recipe will make sense to you.
In the most simplest explanation…
Sourdough bread baking is just
- add your starter to your ingredients,
- let the dough ferment until it’s almost double in size,
- shape it and then,
- bake it.
This is literally what the “no-knead” or “overnight” method is.
It’s the lazy man’s sourdough —where you mix everything and don’t do anything until the very end.
If you choose to make bread this way, that’s literally all there is —mix, wait, shape and bake.
Is it too good to be true? Lazy-man’s sourdough?
You can take your chances with the no-knead / overnight method. It’s worthwhile to do at least once.
But just like everything in life, nothing is as easy as it seams. There is no free lunch.
If you can make the “no-knead” or “over-night” sourdough method work for you —more power to you!
I would do it if you’re in a pinch and need bread but don’t have time to do all the steps.
If you want to know the full process in detail, keep reading…
Stage 1 – Preparation
Okay! Let’s make sourdough!
Note: This is the method of making sourdough. The process remains the same whichever sourdough loaf you are making, so any sourdough bread recipe will apply. The pictures in this tutorial were from me making Country Sourdough. So if you want to bake along with me, get the ingredients list for Country Sourdough here.
This stage takes roughly 4-5hrs at 70-72F.
You don’t have to be home during this time.
Step 1 – Prepare the sourdough starter
ATTENTION: If you do not have a sourdough starter yet, you have two options here:
- make a sourdough starter from scratch (takes 14 days), OR
- buy my sourdough starter (ready in 2-3 days)
We will need 100g of sourdough starter to leaven this dough
So in a new container, mix
– 50g of your active starter,
– 50g of flour
– 50g of water
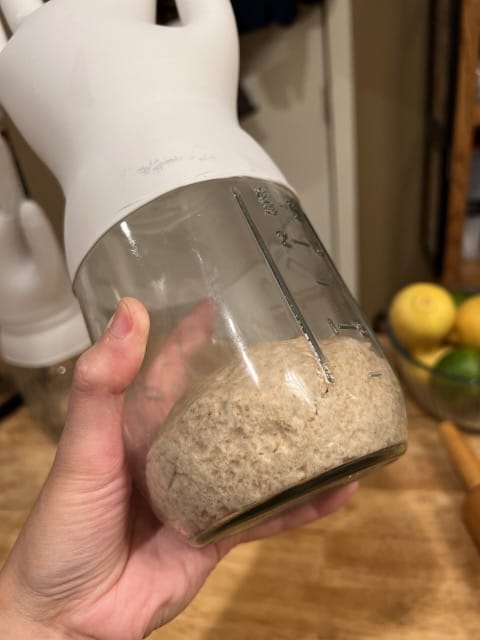
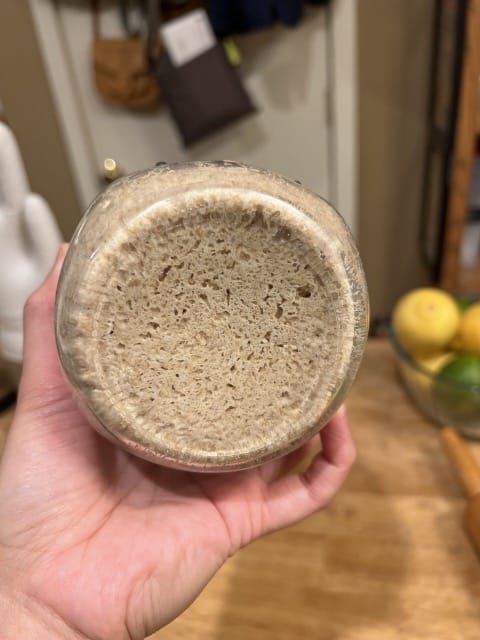
Your starter’s peaked when it’s doubled in size and still has a dome on top. Once the dome has deflated, it’s no longer at peak.
If there is no dome and you can see a line where it started to sink back down, it’s definitely not at peak anymore.
You can still use a starter that’s not at peak, it just means your starter isn’t as active and might take longer to ferment. It will also taste very sour.
While we are waiting for this to come to peak (~4hrs at 74F), let’s autolyse the dough.
Step 2 – Autolyse your dough for 2-4hrs (optional)
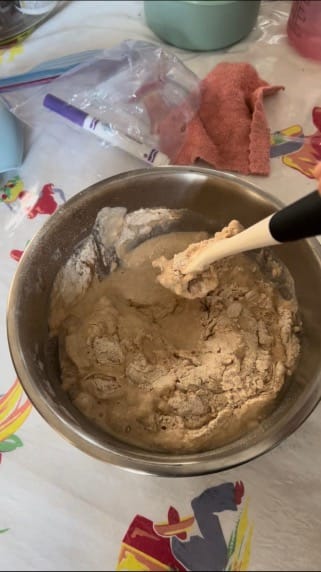
Mix your dry ingredients into your wet, leaving out the starter. We’ll mix that in later. Make sure everything is incorporated. Let the dough rest for 15 minutes.
After 15 minutes, your dough should be easier to work with. It should have developed enough gluten strength to develop a windowpane (you can see through it if stretched really thin).

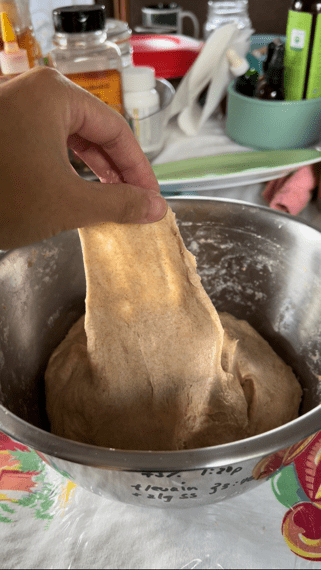
Start folding the dough into itself. Fold it as many times as the dough will allow without tearing. ⤵️
Then, let the dough rest for 2-4hrs. This is called autolyse. You’re letting the dough develop strength before you mix in your starter.
It gives your dough a head start.
That’s because as soon as your starter is mixed into your dough, the clock starts. Your dough will now start to ferment.
Autolysing helps us start our fermentation with an already-strong dough.
It is completely optional.
You don’t need to do this. You can just mix everything all at once.
Autolyse is especially helpful when you are making HIGH hydration doughs (anything over 72% hydration).
Stage 2 – Bulk Fermentation
Bulk fermentation starts once you mix your starter with your dough.
For “Country Sourdough”, you’ve got roughly 7 hours to turn your dough from a blob that spreads out, into a springy dough that holds its shape. Any more than 7 hours, you run the risk of over-fermenting.
Getting your fermentation times correct is a skill that will come with time and repetition. Once you’ve baked multiple loaves in a row, you will get the hang of it.
You will be able to guess your fermentation times pretty easily.
It’s wholly dependent on how active your starter is, how much starter you are using and the temperature of your dough.
Prepare to be at home during this time.
Step 1 – Combine your sourdough starter into your dough
Once your starter’s come to peak, gently combine it into your dough.
You are not mixing.
You are kind of just folding the starter into the dough and mushing it around with your fingers/spatula.
If you mix rapidly, you’ll tear all the gluten development you’ve built during autolyse.
You want to fold and mush, fold and mush, until the starter is completely absorbed by the dough. It takes me 5 or 7 minutes to do this by hand.
How do you know when you’re done?
It helps if your starter is a different color from your dough. My starter is a rye starter, so it’s dark brown/grey and it contrasts starkly against my dough. It’s a good visual aid.
If you don’t have this visual aid, you’re going to have to go by feel. Your starter has a different texture from your dough, so you will be able to feel it when it’s not incorporated enough.
The moment your starter is mixed with your dough, the bacteria and yeasts will start to ferment the dough. You are now on the clock.
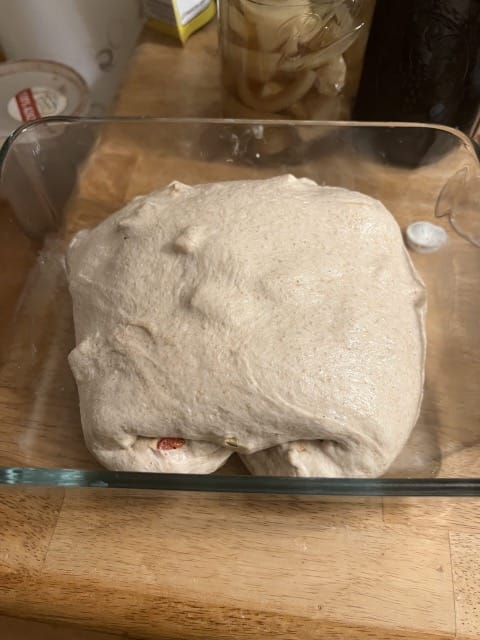
Step 2 – Dough Strengthening/Folding
During this fermentation process, it’s the baker’s job to develop the gluten network and strengthen the dough.
You need to transform that dough from a blob that spreads out, into a springy dough that holds its shape.
Basically, you need to knead the dough.
You fold the dough as many times as it will allow before it starts to tear. Then, you let the dough rest for 30 min to 1 hr (it will spread out again).
Then you do your series of folds again. Careful to stop as soon as you feel the dough resisting. Careful not to tear.
Repeat this until you’re nearing the end of your fermentation time (roughly 5-7hrs at 74F —less time if warmer, more time if colder).
You might be able to get in 2-3 folding sessions before it’s time to shape the dough and put in a banneton (or any other round/oval bowl) for its final proofing.
There are many ways to knead dough, and the techniques differ depending on what you want to achieve. But generally speaking, they are all basically a form of folding the dough into itself. The more folds you get in, the stronger your dough is.
Here’s a few of my favorite folding techniques:
Stretch and Folds ⤵️
Stretch and folds are an oldie, but goodie type of dough strengthening.
Basically, you grab a corner, stretch it ’til it can’t, and then fold it on top.
Do it over and over, clockwise, until the dough starts resisting. Careful not to tear the dough.
Let the dough rest 20-30 minutes before you do another series of stretch and folds.
If the dough is sticking to your fingers, wet your hands. It helps if you do this next to your sink or bowl of water.
Coil Folds ⤵️
See how wet this dough is? This is a very high-hydration dough, 80%.
With high-hydration doughs, it’s even more important to develop dough strength because there is just so much water weighing the dough down.
Coil folds are a really good way to achieve that.
Stretch and folds give you 1 fold with each rotation, whereas coil folds give you double that.
Tuck and Roll Fold ⤵️
If you are doing multiple loaves at once, like I am here in this video, the tuck and roll fold is a good choice.
I like that it lets you get in A LOT of folds in one rotation. I didn’t count how many folds I was able to do in this video, but it’s a lot.
Watch how this dough transforms in just 2 minutes.
P.S. You can do this for single loaves too, especially if your dough is really extensible (stretchy but not strong)
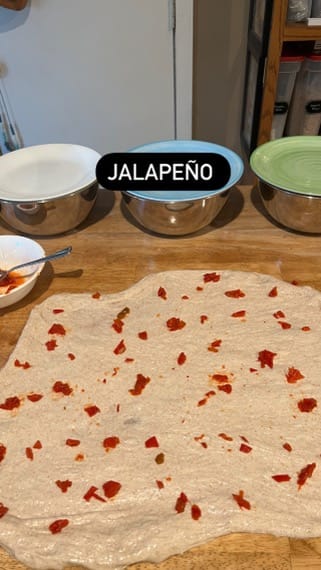
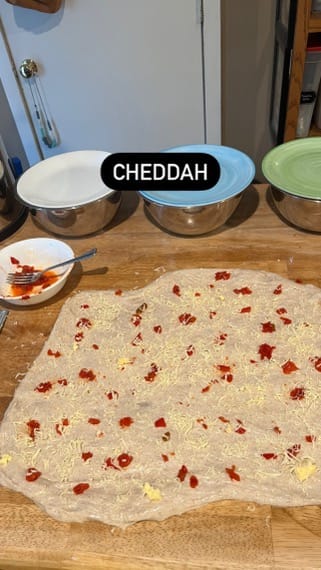
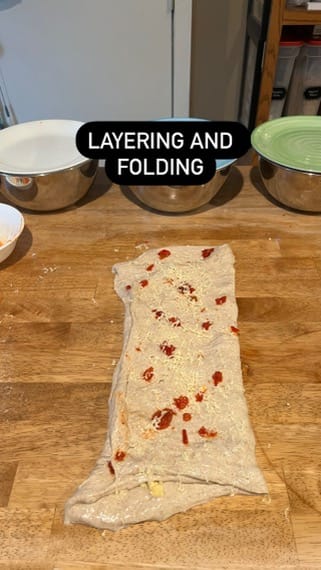
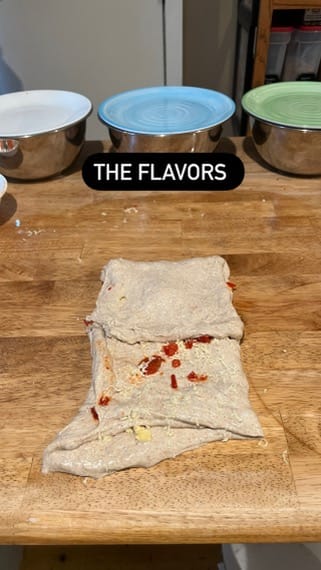
Lamination ⤵️
This folding technique is when you stretch out your dough (as far and thin as it will allow before tearing) and fold as many times as it will allow you (without tearing).
You want to stretch from the center of the dough, and not the corners.
And make sure you lightly water your work surface and your hands. Otherwise, your dough will stick everywhere.
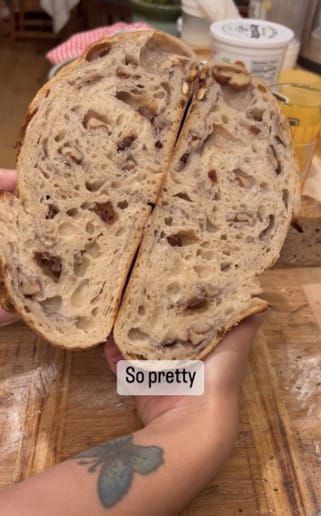
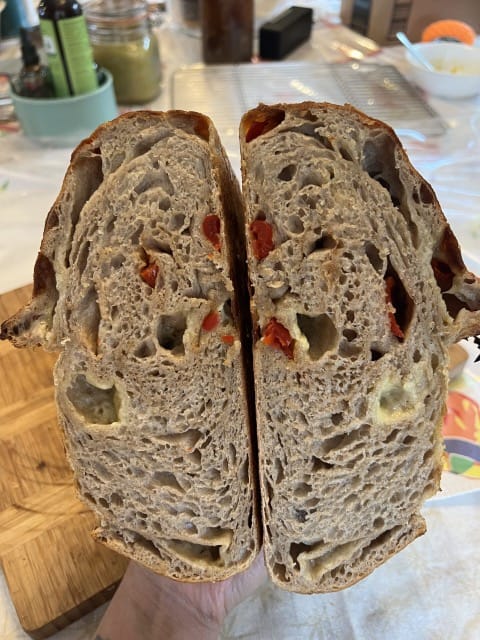
This folding technique is particularly helpful if you want to add toppings to your dough. It will distribute your toppings/flavors evenly with each and every fold.
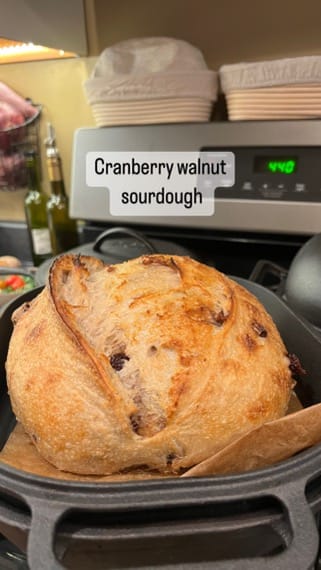
For example, see how I added jalapeños and cheddar in the pics below:
Folding Techniques Recap
You can choose to do just one technique or a combination of techniques, it’s up to you. They are all fun to do and worthwhile to practice.
I used to do a combination of stretch and folds, then lamination, then coil folds —but lately, I’ve been really liking just doing tuck and rolls. So much easier and less time consuming. Plus, it’s what they do in professional bakeries, so if it’s good enough for them, it’s good enough for me!
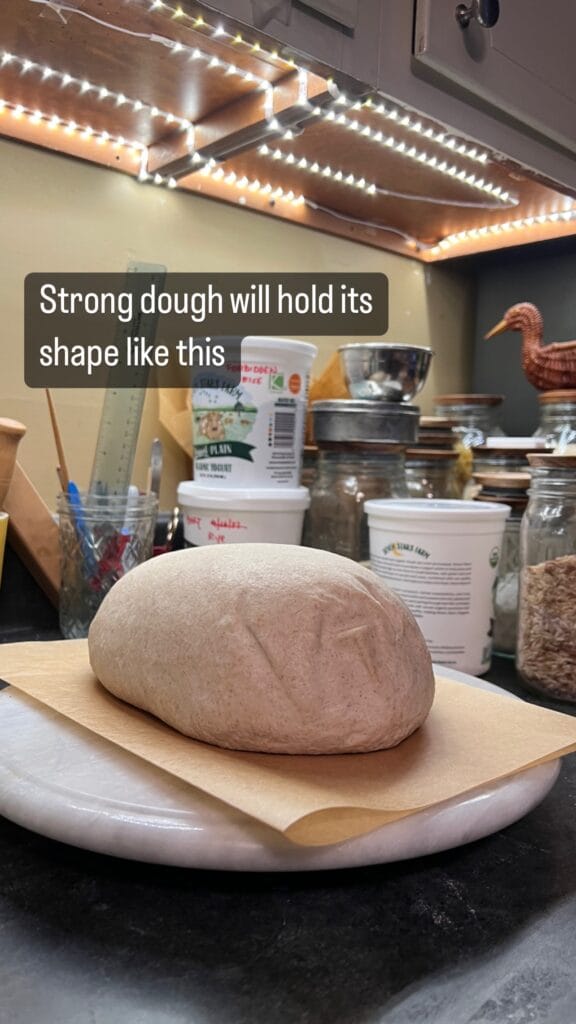
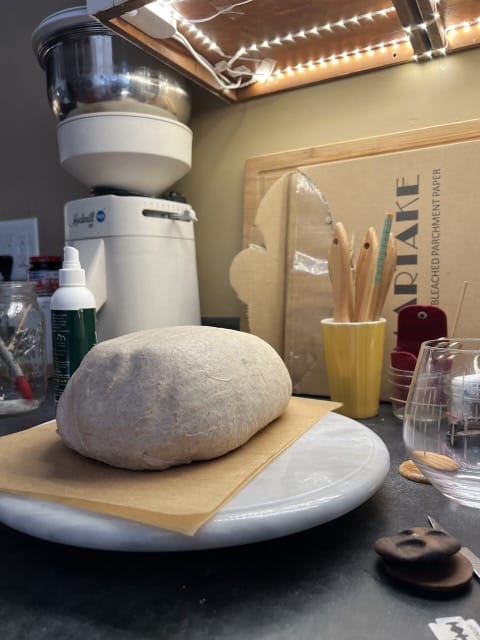
Step 3 – Shaping
Okay, after the 6hr mark, it’s time to start shaping.
Shaping is what you need to do before you put the dough in a banneton (or any round/oval bowl) to do its final proof.
Shaping is just a series of rapid folding to make the dough super-taught. Then you put the dough in a bowl for the remainder of its fermentation process. In there, your dough will continue to double in size. By the time it’s ready for baking, you take it out of the banneton, and hopefully, you’ve built enough dough strength that it will hold its shape.
You can shape your dough into a boule (round) or a batard (oval). I prefer batards for daily bread and boules for bread bowls.
Here’s how I shape my bread:
For high-hydration doughs, I like to do an envelope fold, then stitch, then tuck and roll. Pinch the sides to make a seam.
If envelope folds aren’t for you, here’s another technique:
Tri-fold, then tuck and roll. Pinch the sides to make a seam.
Step 4 – Final Proofing
Hooray, we’re nearly there!
After shaping, it’s time for final proofing.
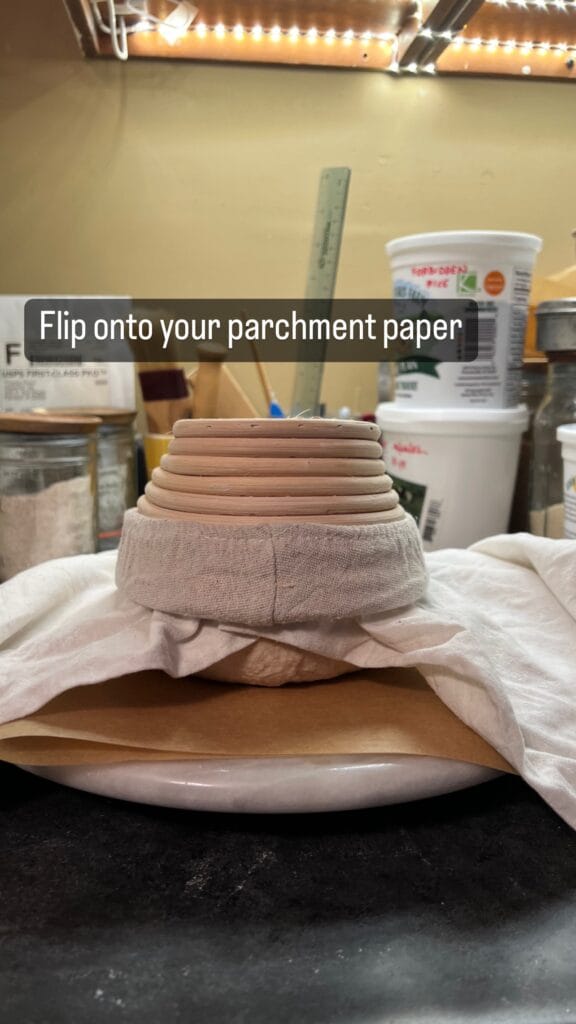
If you need to bake right away, let your dough final proof at room temp up until almost the end of fermentation (around the 7hr mark), then stick it in the freezer for 30 min to 1 hr.
Then, take it out of the freezer, flip it out of your banneton onto a parchment paper, score it, and then bake it.
If you go over 7hrs, you run the risk of over-fermentation. You will see your dough deflate and start to disintegrate into a sticky blob. It has essentially become a gigantic starter.
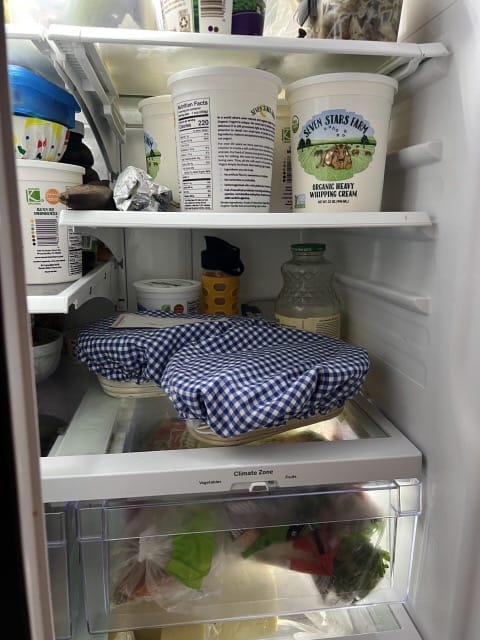
Cold Retard – preferred method
If you don’t have to bake right away, final proof your dough in the fridge for a 12-16hrs cold retard.
This is what I do.
Your dough will continue to ferment and double in size in the fridge, just really really slowly.
During this time, the dough will have some time to develop flavors. Just like how soup gets better in the fridge a few days later.
If you decide to do this, start shaping your dough at around 6hr mark (from the time you’ve mixed your starter with your dough) —making sure you get in as many folds before then. Put it in your banneton, and then place it in the coldest part of your fridge —away from the door and surrounded by other cold things.
Since we put it in the fridge at around the 6hr mark in the fermentation process, I’d say you can leave this in the fridge for 16hrs max.
Any longer than that, you run the risk of over-fermentation.
Stage 3 – Scoring and Baking
Okay, after final proofing your dough, whether it’s at room temp or in your fridge, there’s a few guidelines with baking the dough:
SCORING
The dough releases steam during baking. —and you know how water will always find the path of least resistance?
Well, the water in the dough will find where the gluten is the weakest (usually the bottom sides) and will blow out through there.
This is why you MUST score your dough before putting it in the oven.
There are two types of scores:
1) the expansion score (or functional score) —which is necessary, and
2) decorative scores —completely optional, but fun to do. If you decide to do this, make sure you still do an expansion score.

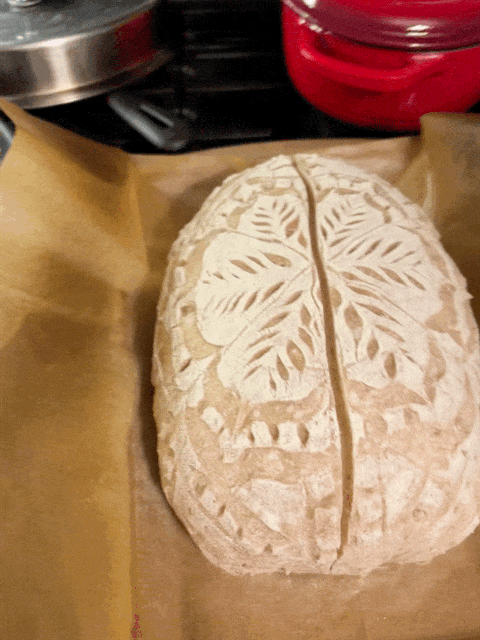
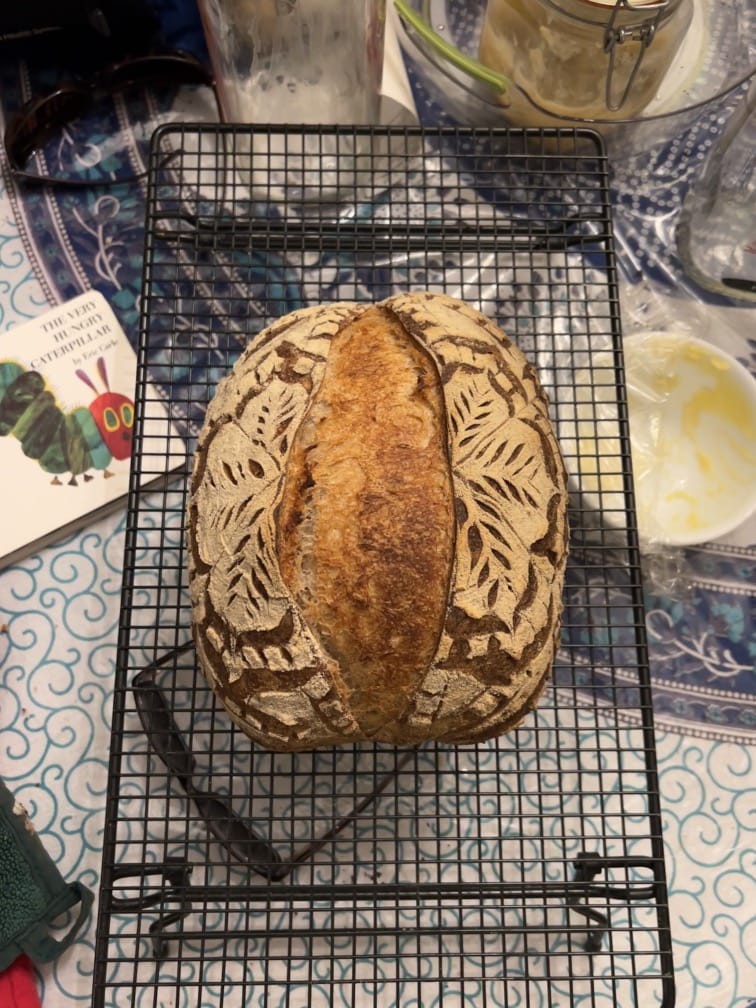
Expansion scores
When you do these scores, you can control where that steam vents. So instead of having an ugly blow out, you have this very nice expansion score that lets the dough rise in the oven evenly and beautifully (ovenspring), producing something called an ear.

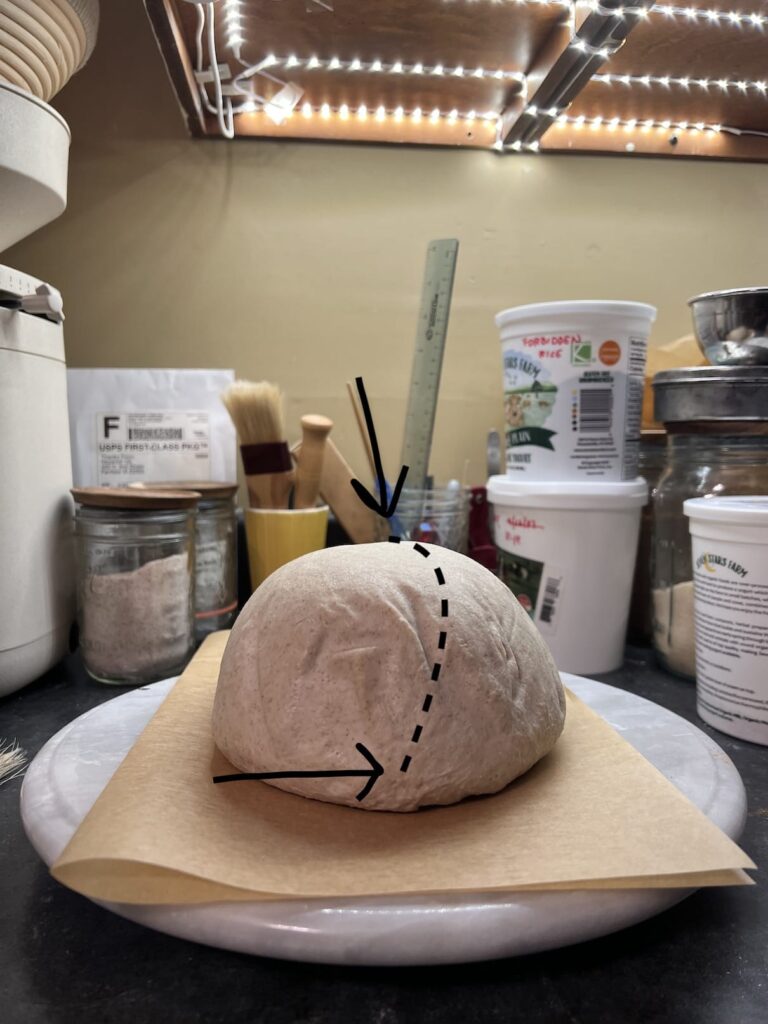
How to do your expansion score
To get an ear like in the pics above,
visually mark the middle of your dough.
You’re going to place your razor at the top of the dough, in the middle.
Hold your razor at a 45 degree angle, not straight down.
From top middle to bottom middle, use your razor to slice into your dough, at a curve (not a straight line), 1cm to 1 ½ cm deep.
Scoring angle
You’re going to score from the very top to the very bottom, at a curve, not straight down the middle, like this.
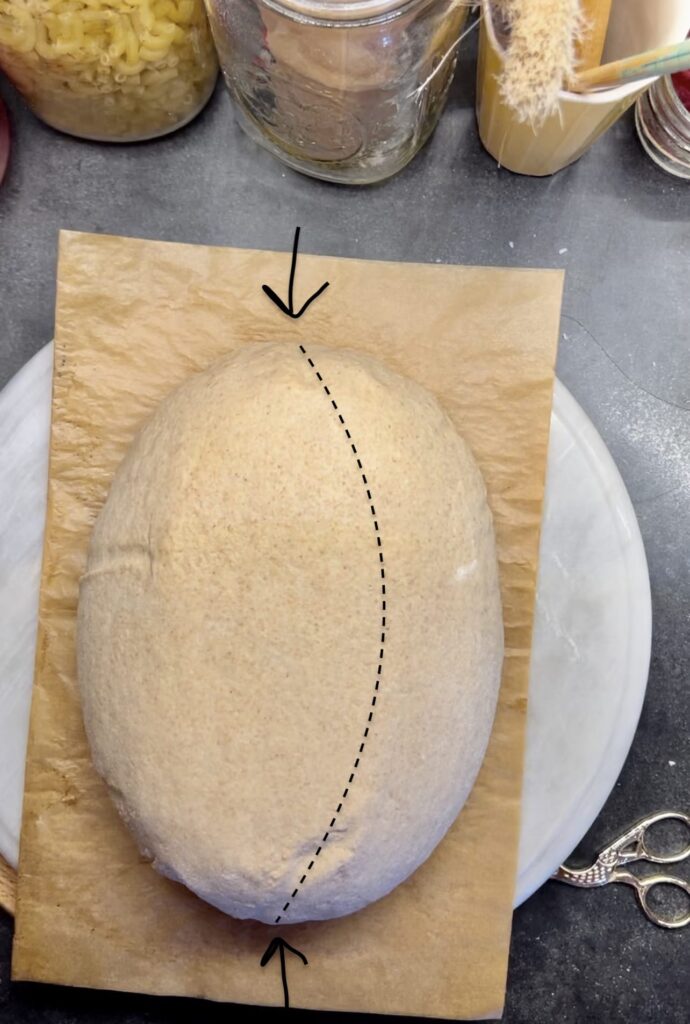
Technically, you can score at any angle.
But I prefer to score at a curve, because then you can get maximum ovenspring and you get a nice ear.
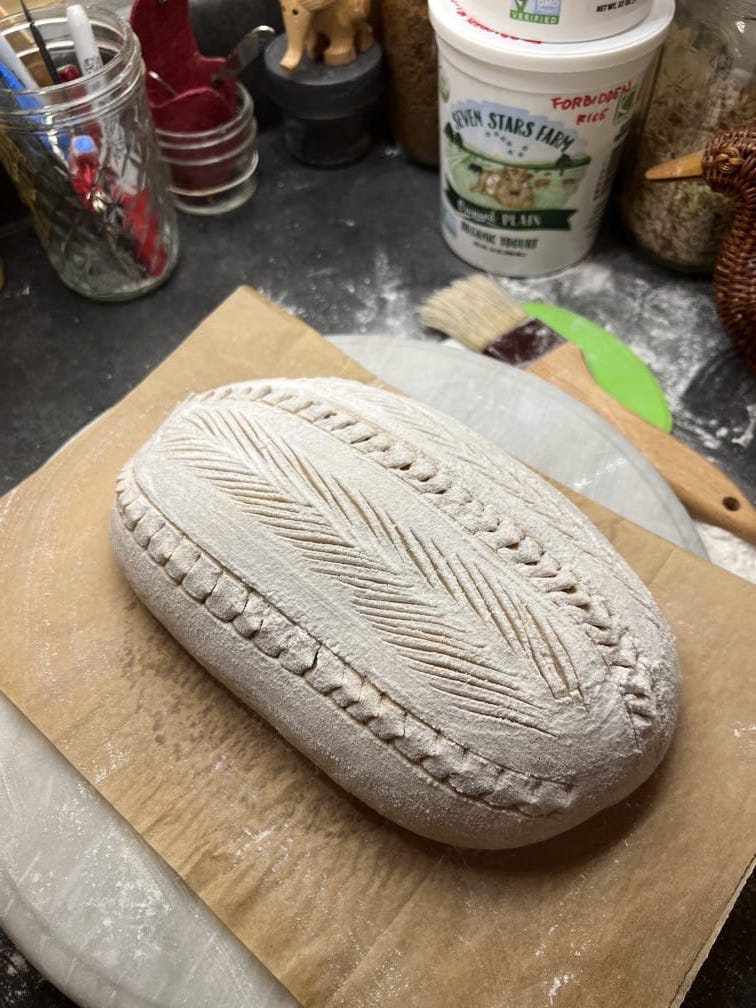
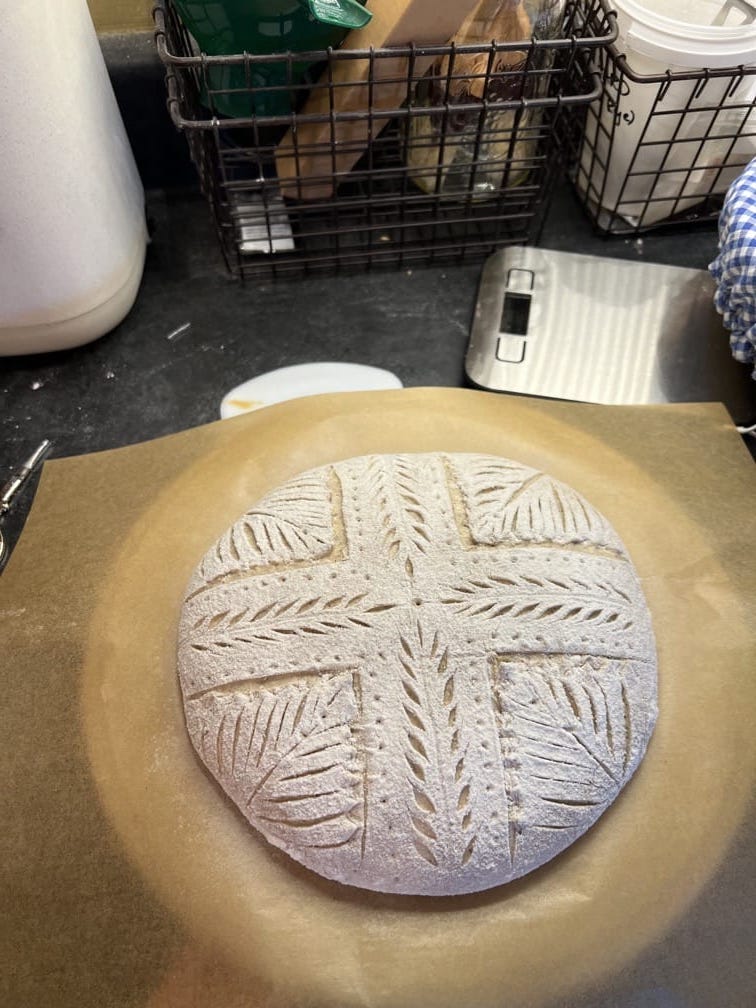
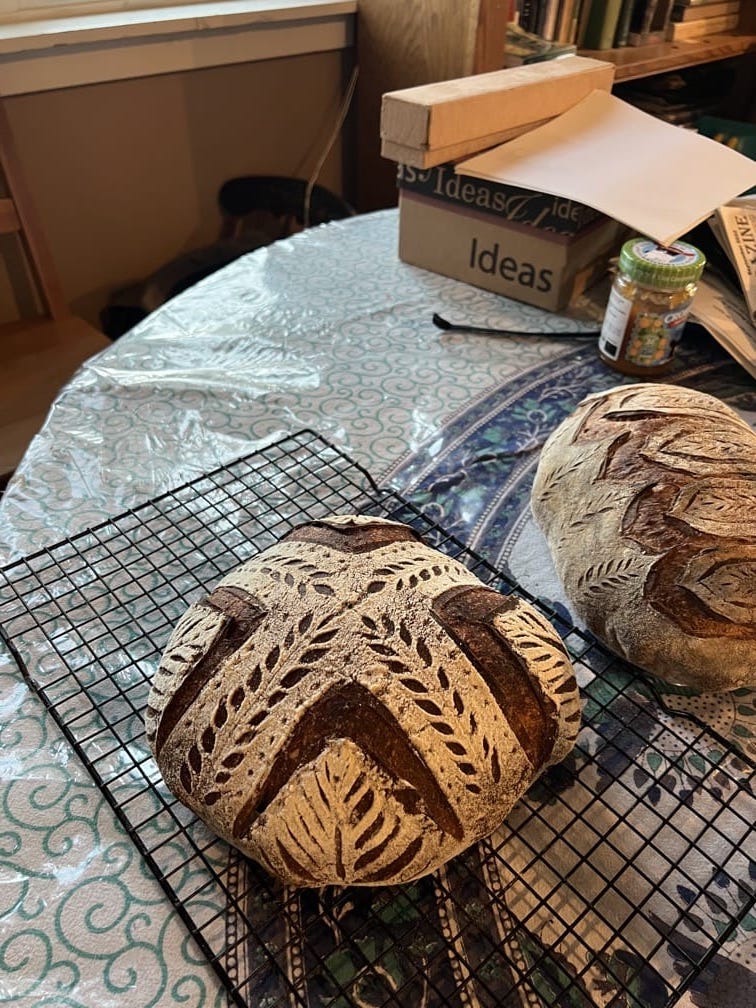
Decorative scoring
If you want to have a little fun and decorate your loaf, you can do intricate, artistic scores.
Here’s a few pics on some decorative scores I’ve done.
Watch me do decorative scoring
Now that you can see the different types of scoring possible, watch me do it in real time.
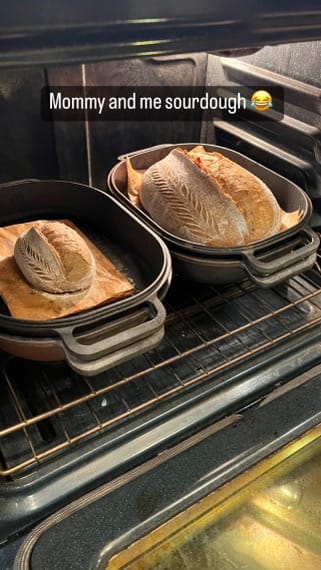
For today’s country sourdough, I decided to go simple and just do leaves. I love to watch the leaves expand —it’s so cool!
It took me 6 ½ minutes to do this, check it out.
BAKING
Okay, next step. Time to bake!
Sourdough bakes best in a Dutch oven and goes through 2 baking steps:
Step 1 – with steam (lid on)
Preheat your oven with your dutch oven inside for at least an 1 hr at 485F.
Flip out your dough on parchment paper, do your scores, and then place it in your dutch oven. Cover it with a lid and bake at 485F for 20 minutes.
The 5 minute score
If you are doing a lot of decorative scoring like I did for this loaf, you do things slightly differently.
Whenever I’m doing lots of detailed scoring, I like to do what’s called, the 5 minute score.
It just means that you let the dough cook 5 minutes in the oven before you do your expansion score.
Cover it with a lid and bake at 485F for the remainder of the 20 minutes.
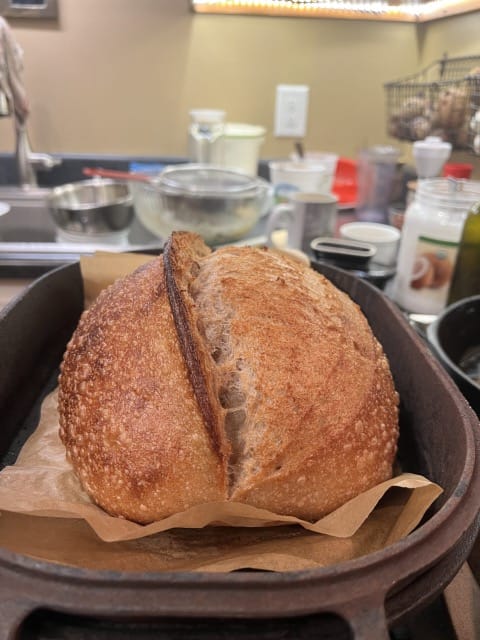
Step 2 – without steam (lid off)
After 20 minutes, it’s the moment of truth.
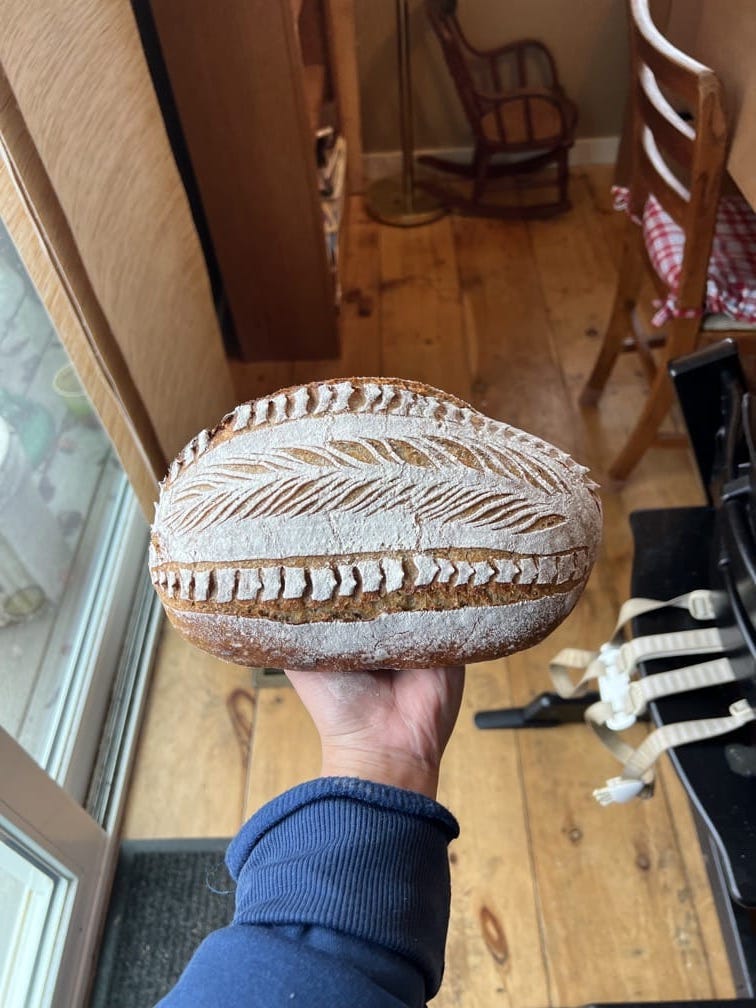
Take the lid off your dutch oven and look at your bread. The insides are done cooking.
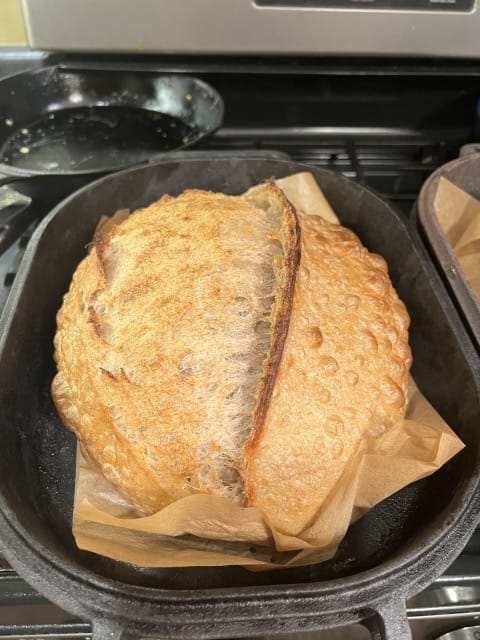
Now we bake it in our dutch oven uncovered for another 10-20 minutes at 440F to develop the crust. The longer you bake it, the darker and harder your crust will be.
Final Reveal
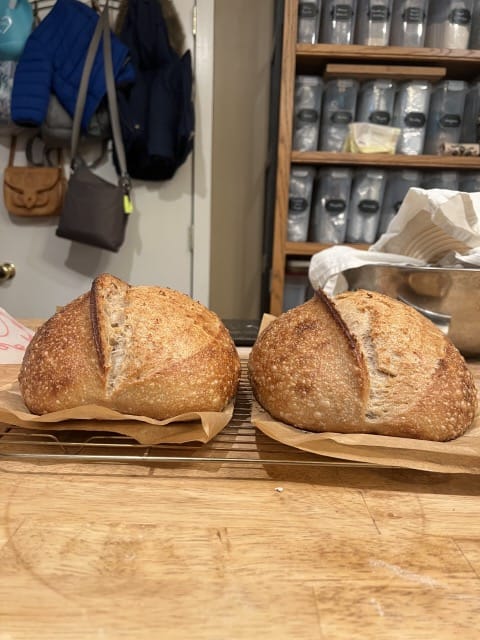
After 10 minutes at 440F, this is how my bread came out looking:

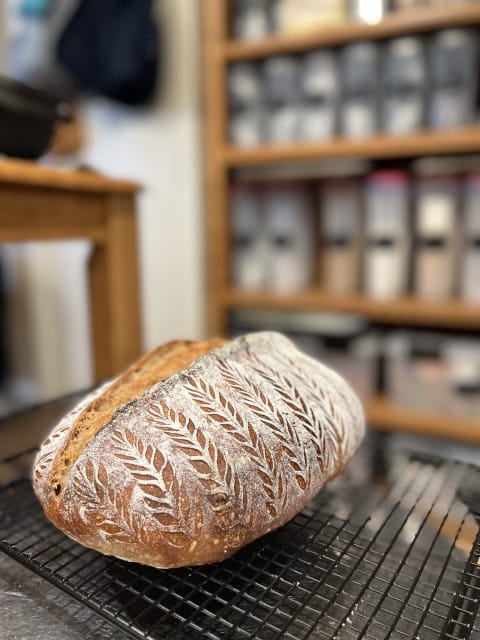
I like the golden crust color.
If you want a dark artisan loaf look, bake it uncovered for another 5-10.
Wait 2hrs before you cut into it
Just like how you would let steak rest before eating, let your bread set for at least 2hrs. It’ll continue to cook as it comes down to room temp, and dry out any excess moisture.
Baking Recap
When we bake our dough with the dutch oven cover on, we trap in the steam. The more steam, the bigger your rise will be. It also prevents the crust from cooking before the rest of the dough can. By the time your dough is baking in steam for 20 minutes, the bread is done cooking.
Then we bake with the cover off.
The second half of baking is to develop your crust. The longer you bake it, the darker and harder your crust will be.
Troubleshooting your bread
Wait at least 2hrs before slicing your bread.
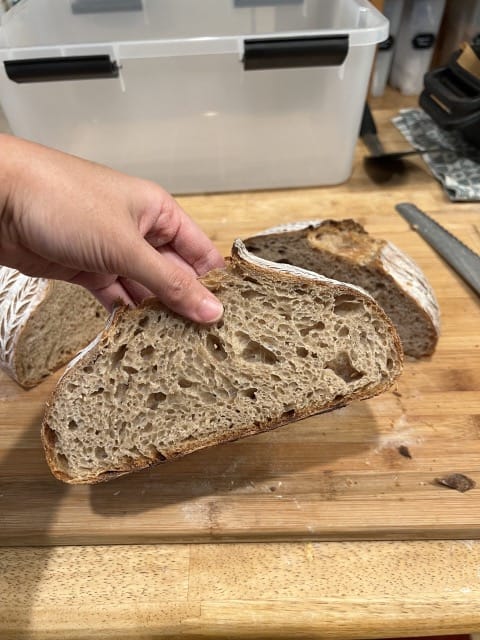
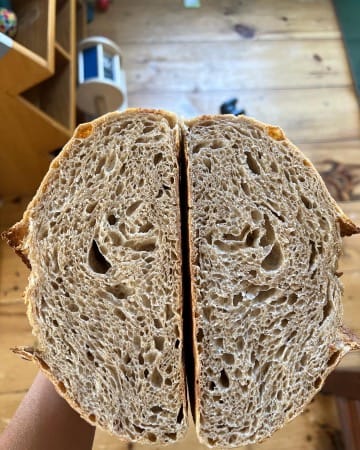
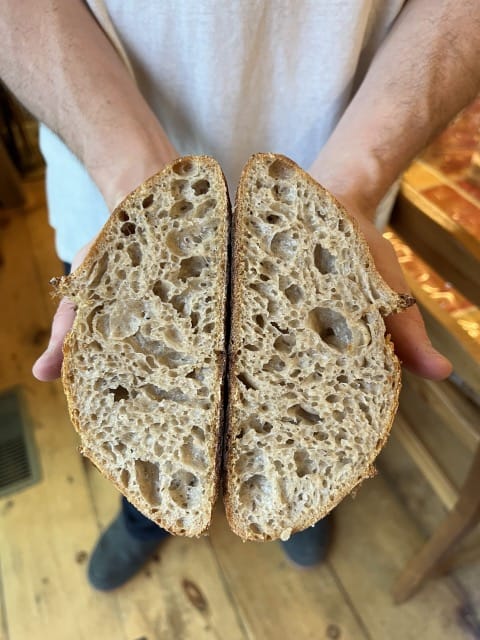
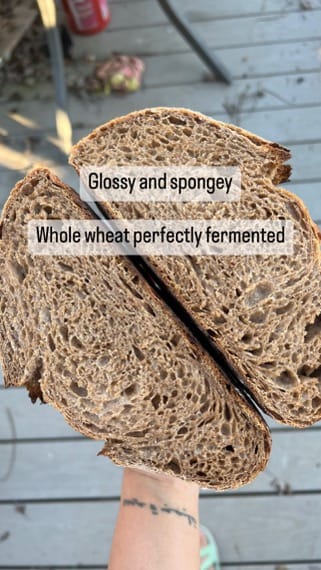
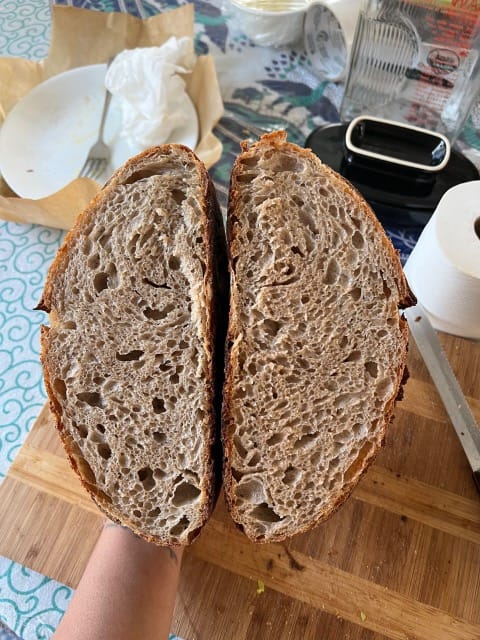
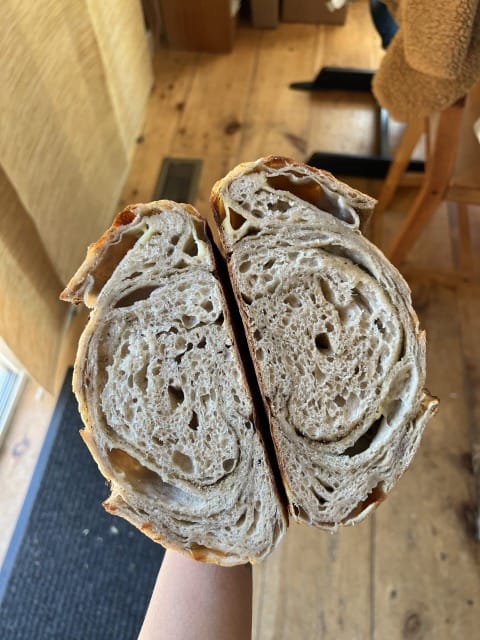
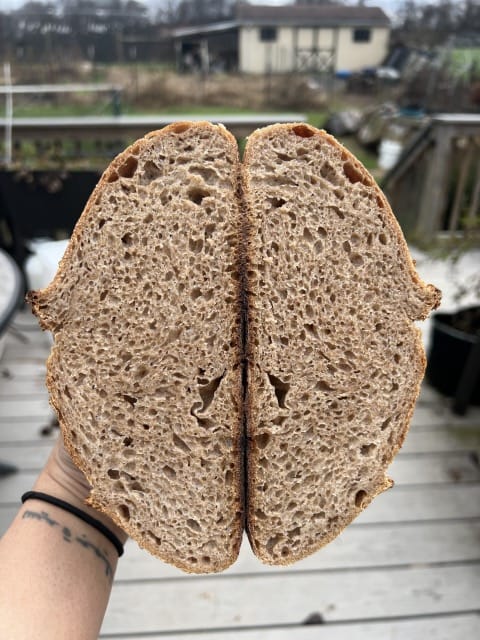
If you want to see how you did, cut the bread in half, straight down the middle, so that you can inspect your crumb (how your bubbles look).
Your crumb gives you insight on how your fermentation went. And since fermentation is what you really want to get on point, it’d be good to take a closer look.
Big, uneven holes with no rhyme or reason suggest under-fermentation.
A flatter bread with tiny holes spaced tightly together suggest over-fermentation, or you used flours with almost no gluten (einkorn, spelt, rye, etc.) —those need special instructions.
I am chasing what is called an, “open crumb.” Bigger holes with a nice pattern. Here’s a compilation of my best crumbs:
Whatever the outcome, be proud, take pics and write notes.
Baking and leavening things naturally is a skill. And it’s fun!
Please take a moment to follow me on instagram: https://instagram.com/howtomakesourdough
And share with all your sourdough baking friends!
Thank you,
Roselle
Leave a Reply